Shotgun is a popular production tracking tool for small and large studios alike, commonly being the main hub for production staff and artists. Technical staff (Pipeline, IT) on the other hand will often be using other tools that align to their workflow more, such as Jira, GitHub, Redmine, etc .
This can create a bit of a communication bottleneck where issues get lost or are left to hang. Wouldn't it be easier if we could synchronize the two platforms so both artists, production and technical personnel can track tickets without having to switch platforms all the time?
To do this we'll need an intermediary application that translates tickets back-and-forth between the two (or more) services. As indicated by the title we'll be integrating with Jira specifically, but the concepts apply to any integration you may need.
Luckily Shotgun software provides the sg-jira-bridge (GitHub)
project which will provide the initial setup for us.
The Shotgun Jira Bridge is an MIT-licensed project that uses Jira Webhooks on one end and Shotgun Event Daemon triggers on the other to push data back-and-forth between them. The diagram provided in their documentation illustrates this succinctly:
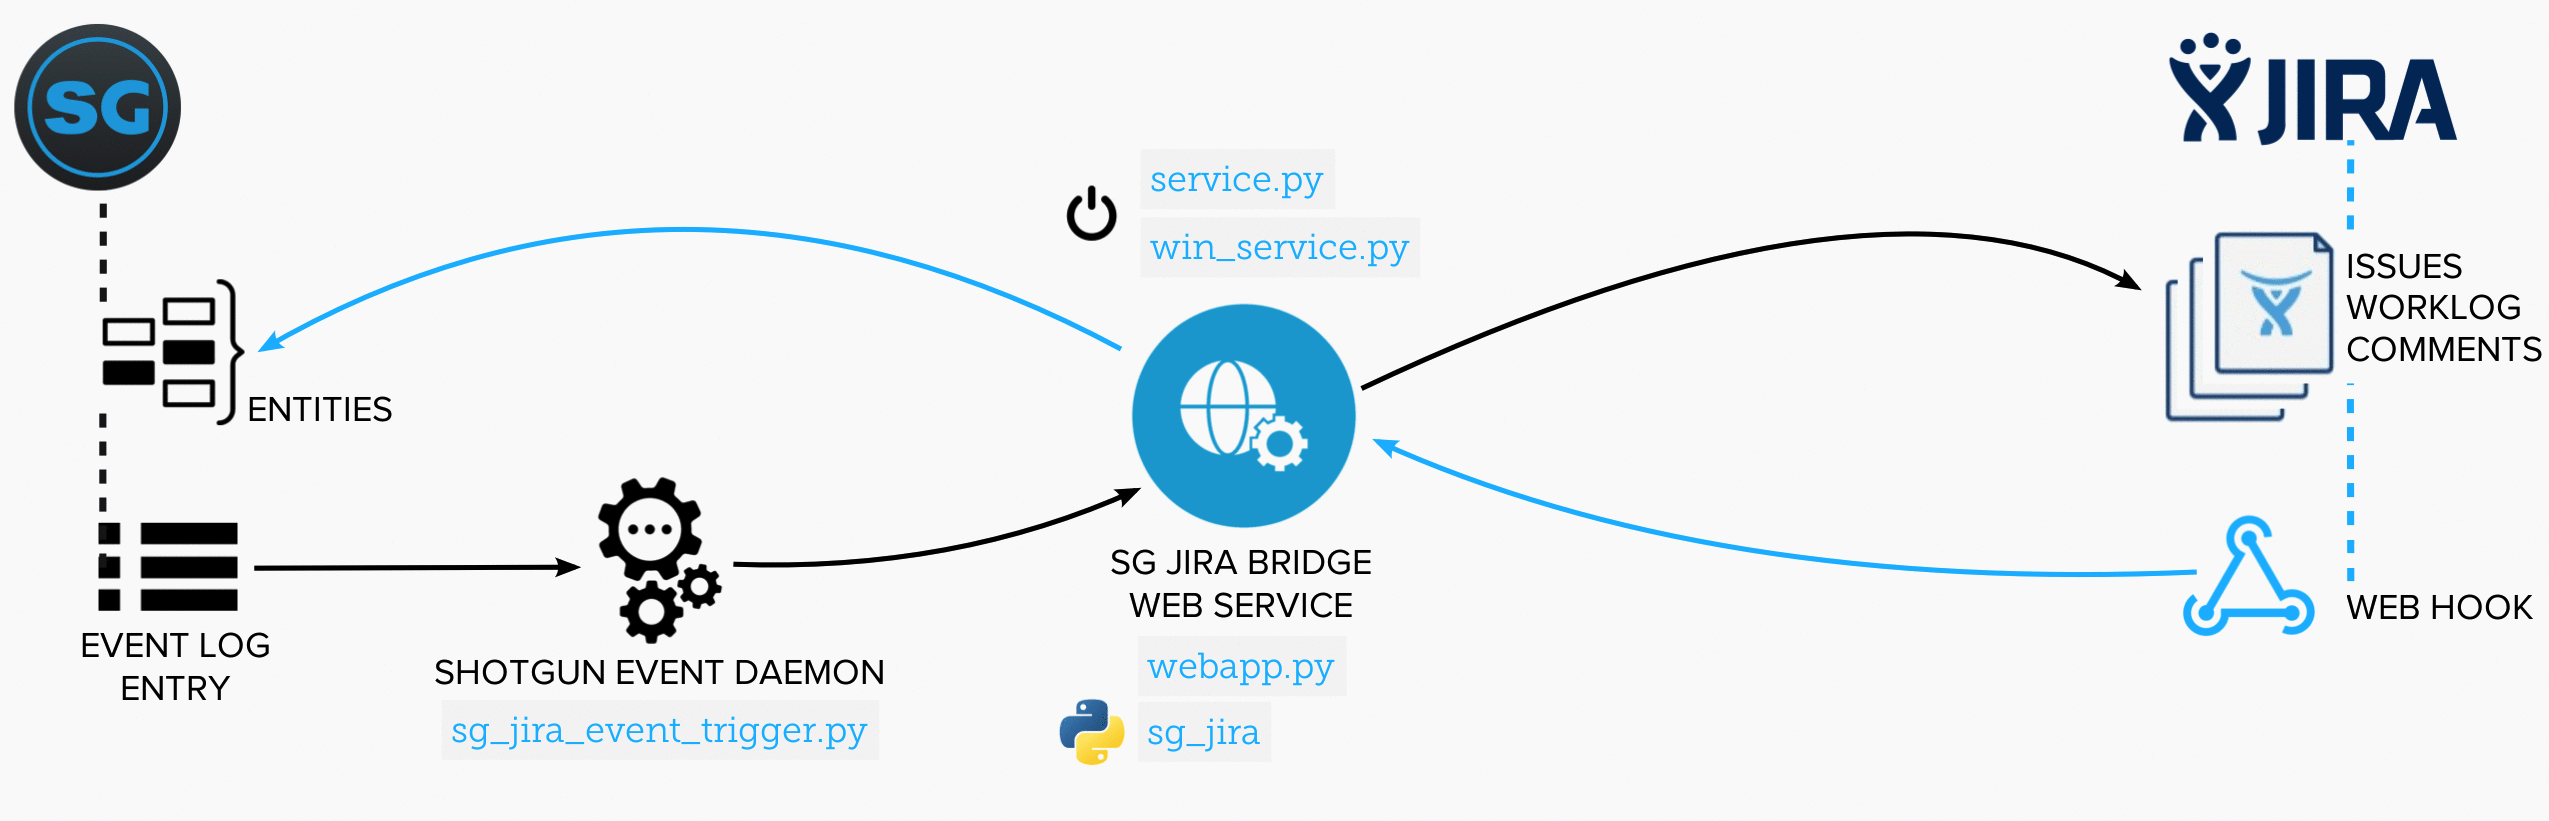 (Image by shotgunsoftware)
Our goals with the bridge are quite simple:
You may have noticed we mentioned "initial setup" earlier. This is because the bridge's features out-of-the-box are rather sparse:
Some of the limitations are a bit more concerning:
Fortunately the bridge is easily customizable so we'll be able to resolve these problems with a bit of legwork.
For a start, we'd like to add support for the Shotgun Ticket entity. It matches Jira's Issue structure much more and doesn't force us to tie them to Tasks. We have the option to link to Tasks if we wish and a Task could even have multiple Tickets in this setup. You can find more information about Tickets in this article from Shotgun including steps to enable it.
The comment structure for Tickets also matches Jira Issues in that they are linear as opposed to a Task's threaded system using notes and replies.
Before we add our customizations we'll have to get the basic framework setup, so let's do that now.
That's it! We'll be going over the setup from scratch. For our example we'll be using a RHEL 8.2
box, resolved by bridge.aws.pixel-nexus.com. Other distros (or even Windows) should work just
fine but will require some tweaking from the steps below.
Some schema changes have to be applied to Shotgun and Jira to track the metadata of related tickets. You can find the specific fields to add in the official documentation, in short you need the following:
Jira Sync URL and Jira Key to know which project to sync
with.Jira Account Key to match them to Jira users.Jira Key and Jira URL to track the related
Issue as well as a Sync in Jira checkbox to determine which to sync.Jira Key to track the corresponding comment.Jira Key fields that we define must enforce unique values.Shotgun Type to associate to the correct type.Shotgun ID to associate to the specific ID.Shotgun URL for a convenient link to the Shotgun page.Note that Jira comments do not store metadata to link themselves to the related reply. We'll solve that problem when we configure the bridge.
For convenience, this Python script will create the fields on Shotgun as described above:
#! /bin/python
import shotgun_api3

# Fill in your Shotgun URL and script credentials here
sg = shotgun_api3.Shotgun(
    base_url="<shotgun_url>",
    script_name="<script_name>",
    api_key="<script_key>")


sg.schema_field_create(entity_type='HumanUser',
                    data_type='text',
                    display_name='Jira Account Id')

sg.schema_field_create(entity_type='Project',
                    data_type='text',
                    display_name='Jira Key')
sg.schema_field_create(entity_type='Project',
                    data_type='url',
                    display_name='Jira Sync URL')

sg.schema_field_create(entity_type='Ticket',
                    data_type='text',
                    display_name='Jira Key')
sg.schema_field_create(entity_type='Ticket',
                    data_type='url',
                    display_name='Jira URL')
sg.schema_field_create(entity_type='Ticket',
                    data_type='checkbox',
                    display_name='Sync In Jira')

sg.schema_field_create(entity_type='Reply',
                    data_type='text',
                    display_name='Jira Key')

# You could ignore Task and Note if you don't plan on using it.

sg.schema_field_create(entity_type='Task',
                    data_type='text',
                    display_name='Jira Key')
sg.schema_field_create(entity_type='Task',
                    data_type='url',
                    display_name='Jira URL')
sg.schema_field_create(entity_type='Task',
                    data_type='checkbox',
                    display_name='Sync In Jira')

sg.schema_field_create(entity_type='Note',
                    data_type='text',
                    display_name='Jira Key')
For each Project that is to be supported, you'll have to fill in the Jira Sync URL and Jira Key. The Jira
Sync URL will always be the same: https://bridge.aws.pixel-nexus.com/sg2jira/default (Replace
the hostname with your own). The Jira Key must match the Jira Project you wish to use, eg. SGJ.
This is what it looks like in the Shotgun UI (with the fields visible):

The bridge application itself processes data coming from the Shotgun Event Daemon and the Jira WebHook, so we'll set those up first.
Note: Although the example uses Python 2, it should be Python 3 compatible.
First let's prepare the base directory. We'll be using /etc/sg-jira-bridge for the
application and create an sgjira user which will run the services. We'll go ahead and clone
the bridge and event daemon repositories as well:
#! /bin/bash
yum install -y python2 git
pip2 install virtualenv
useradd sgjira
basedir=/etc/sg-jira-bridge
mkdir $basedir
git clone https://github.com/shotgunsoftware/sg-jira-bridge.git $basedir/sg-jira-bridge
git clone https://github.com/shotgunsoftware/shotgunEvents.git $basedir/shotgunEvents
Note: If you already have an existing Shotgun Event Daemon instance you can skip most of this section. You will only need to add the trigger script to your plugins and the relevant environment variables.
It's always good practice to setup a virtual environment for your Python applications, especially as we'll be running (at least) two Python applications alongside eachother.
#! /bin/bash
basedir=/etc/sg-jira-bridge
virtualenv $basedir/shotgunEvents/venv
# Install requirements using the requirements.txt from the bridge's trigger.
source $basedir/sgeventd-venv/bin/activate
pip install -r $basedir/sg-jira-bridge/triggers/requirements.txt
deactivate
# Prepare configuration
cp $basedir/shotgunEvents/src/shotgunEventDaemon.conf.example $basedir/shotgunEvents/src/shotgunEventDaemon.conf
mkdir -p /usr/local/shotgun/plugins
# Give ownership to 'sgjira'
chown -R sgjira:sgjira $basedir
# TODO: Modify shotgunEventDaemon.conf to match your setup.
You'll have to change the server, name, key to match your Shotgun
server URL, script name, and script key. You'll also have to add the trigger as a plugin path. If you
get stuck, see the wiki on
GitHub for more detailed instructions.
Lastly, the trigger uses separate credentials from the daemon. These must be supplied from the environment, so for testing purposes just export these in your shell:
export SGDAEMON_SGJIRA_NAME="<my-script-name>"
export SGDAEMON_SGJIRA_KEY="<my-script-key>"
You can then test the daemon using
/etc/sg-jira-bridge/shotgunEvents/src/shotgunEventDaemon.py foreground.
If all is looking well the last step is to setup a systemd unit to manage it.
The Jira Webhook is trivial to setup. The settings are:
We'll setup a separate virtual environment for this, similar to the daemon:
#! /bin/bash
basedir=/etc/sg-jira-bridge
virtualenv $basedir/bridge-venv
source $basedir/bridge-venv/bin/activate
pip install -r $basedir/sg-jira-bridge/requirements.txt
deactivate
# Give ownership to 'sgjira'
chown -R sgjira:sgjira $basedir
Again, running the webapp requires some credentials. This can come from a .env file, but for testing we'll just export it from our shell:
# Shotgun
 export SGJIRA_SG_SITE="<shotgun-url-here>"
 export SGJIRA_SG_SCRIPT="<my-script-name>"
 export SGJIRA_SG_SCRIPT_KEY="<my-script-key>"
 # Jira
 export SGJIRA_JIRA_SITE="<jira-url-here>"
 export SGJIRA_JIRA_USER="<jira-email-script-is-registered-to>"
 export SGJIRA_JIRA_USER_SECRET="<jira-api-key-here>"
Before we can test it, we'll have to import the users. This is something we'll have to do each time new users are added on Shotgun. The bridge provides a convenient script for this:
source $basedir/bridge-venv/bin/activate
python update_shotgun_users.py --settings $basedir/sg-jira-bridge/settings.py --project <shotgun-project-id>
You can run the bridge (using the virtual environment still), with
source $basedir/bridge-venv/bin/activate
python $basedir/sg-jira-bridge/webapp.py --settings $basedir/sg-jira-bridge/settings.py --port 9090
If you now navigate (or curl) to localhost:9090 you should get a basic HTML page stating
The server is alive. If that looks good go ahead and shut it back down and configure a systemd
unit for it. The bridge provides a service.py for easy of installation.
As our bridge application is running on the cloud we'll be running it behind Nginx, which will be facilitating TLS for our connection. If your Jira and Shotgun are locally hosted, you could technically skip this step (although I recommend you setup HTTPS anyway).
The certificates we're using are provided by the amazing Lets Encrypt service.
The setup is fairly trivial so we'll skip the basics here, just remember to change the root location to
proxy_pass to our web application. That should look like:
# nginx.conf snippet
server {
    server_name bridge.aws.pixel-nexus.com;

    # Server level configuration here...

        location / {
            proxy_pass http://localhost:9090/;
            proxy_set_header X-Real-IP $remote_addr;
            proxy_set_header Host $host;
        }
# ... rest of the config ...
}
Lastly, we'll need to enable a rule in SELinux to allow Nginx to connect to the bridge:
setsebool httpd_can_network_connect 1. To make this survive a restart we'll have to specify
it's permanent as well, which is achieved with the simple -P flag:
setsebool -P httpd_can_network_connect 1.
As we said before, the bridge is designed to be extensible. To illustrate this we'll be looking at our Ticket implementation (which is currently not included by default). Remember that we already added the fields on Shotgun during Shotgun preparation step.
To avoid bloating this article we'll be going over the general architecture. You can find the
implementation details in our BitBucket
fork under the feat/tickets branch.
The official documentation provides a good overview of the relevant pieces in the architecture:
When the Bridge receives a payload to process, be it from Jira or Shotgun, it will hand it off to a
Syncer. That will in turn go through its SyncHandlers to process the event (if
applicable). But how does the Bridge know which Syncer to pick?
The chosen Syncer is determined by URL the payload is sent to and some configuration in
settings.py. Do you remember during the Shotgun Project and Jira Webhook setup we used
sg2jira/default and jira2sg/default in our URL? That default in fact
refers to the syncer specified under that key in settings.py.
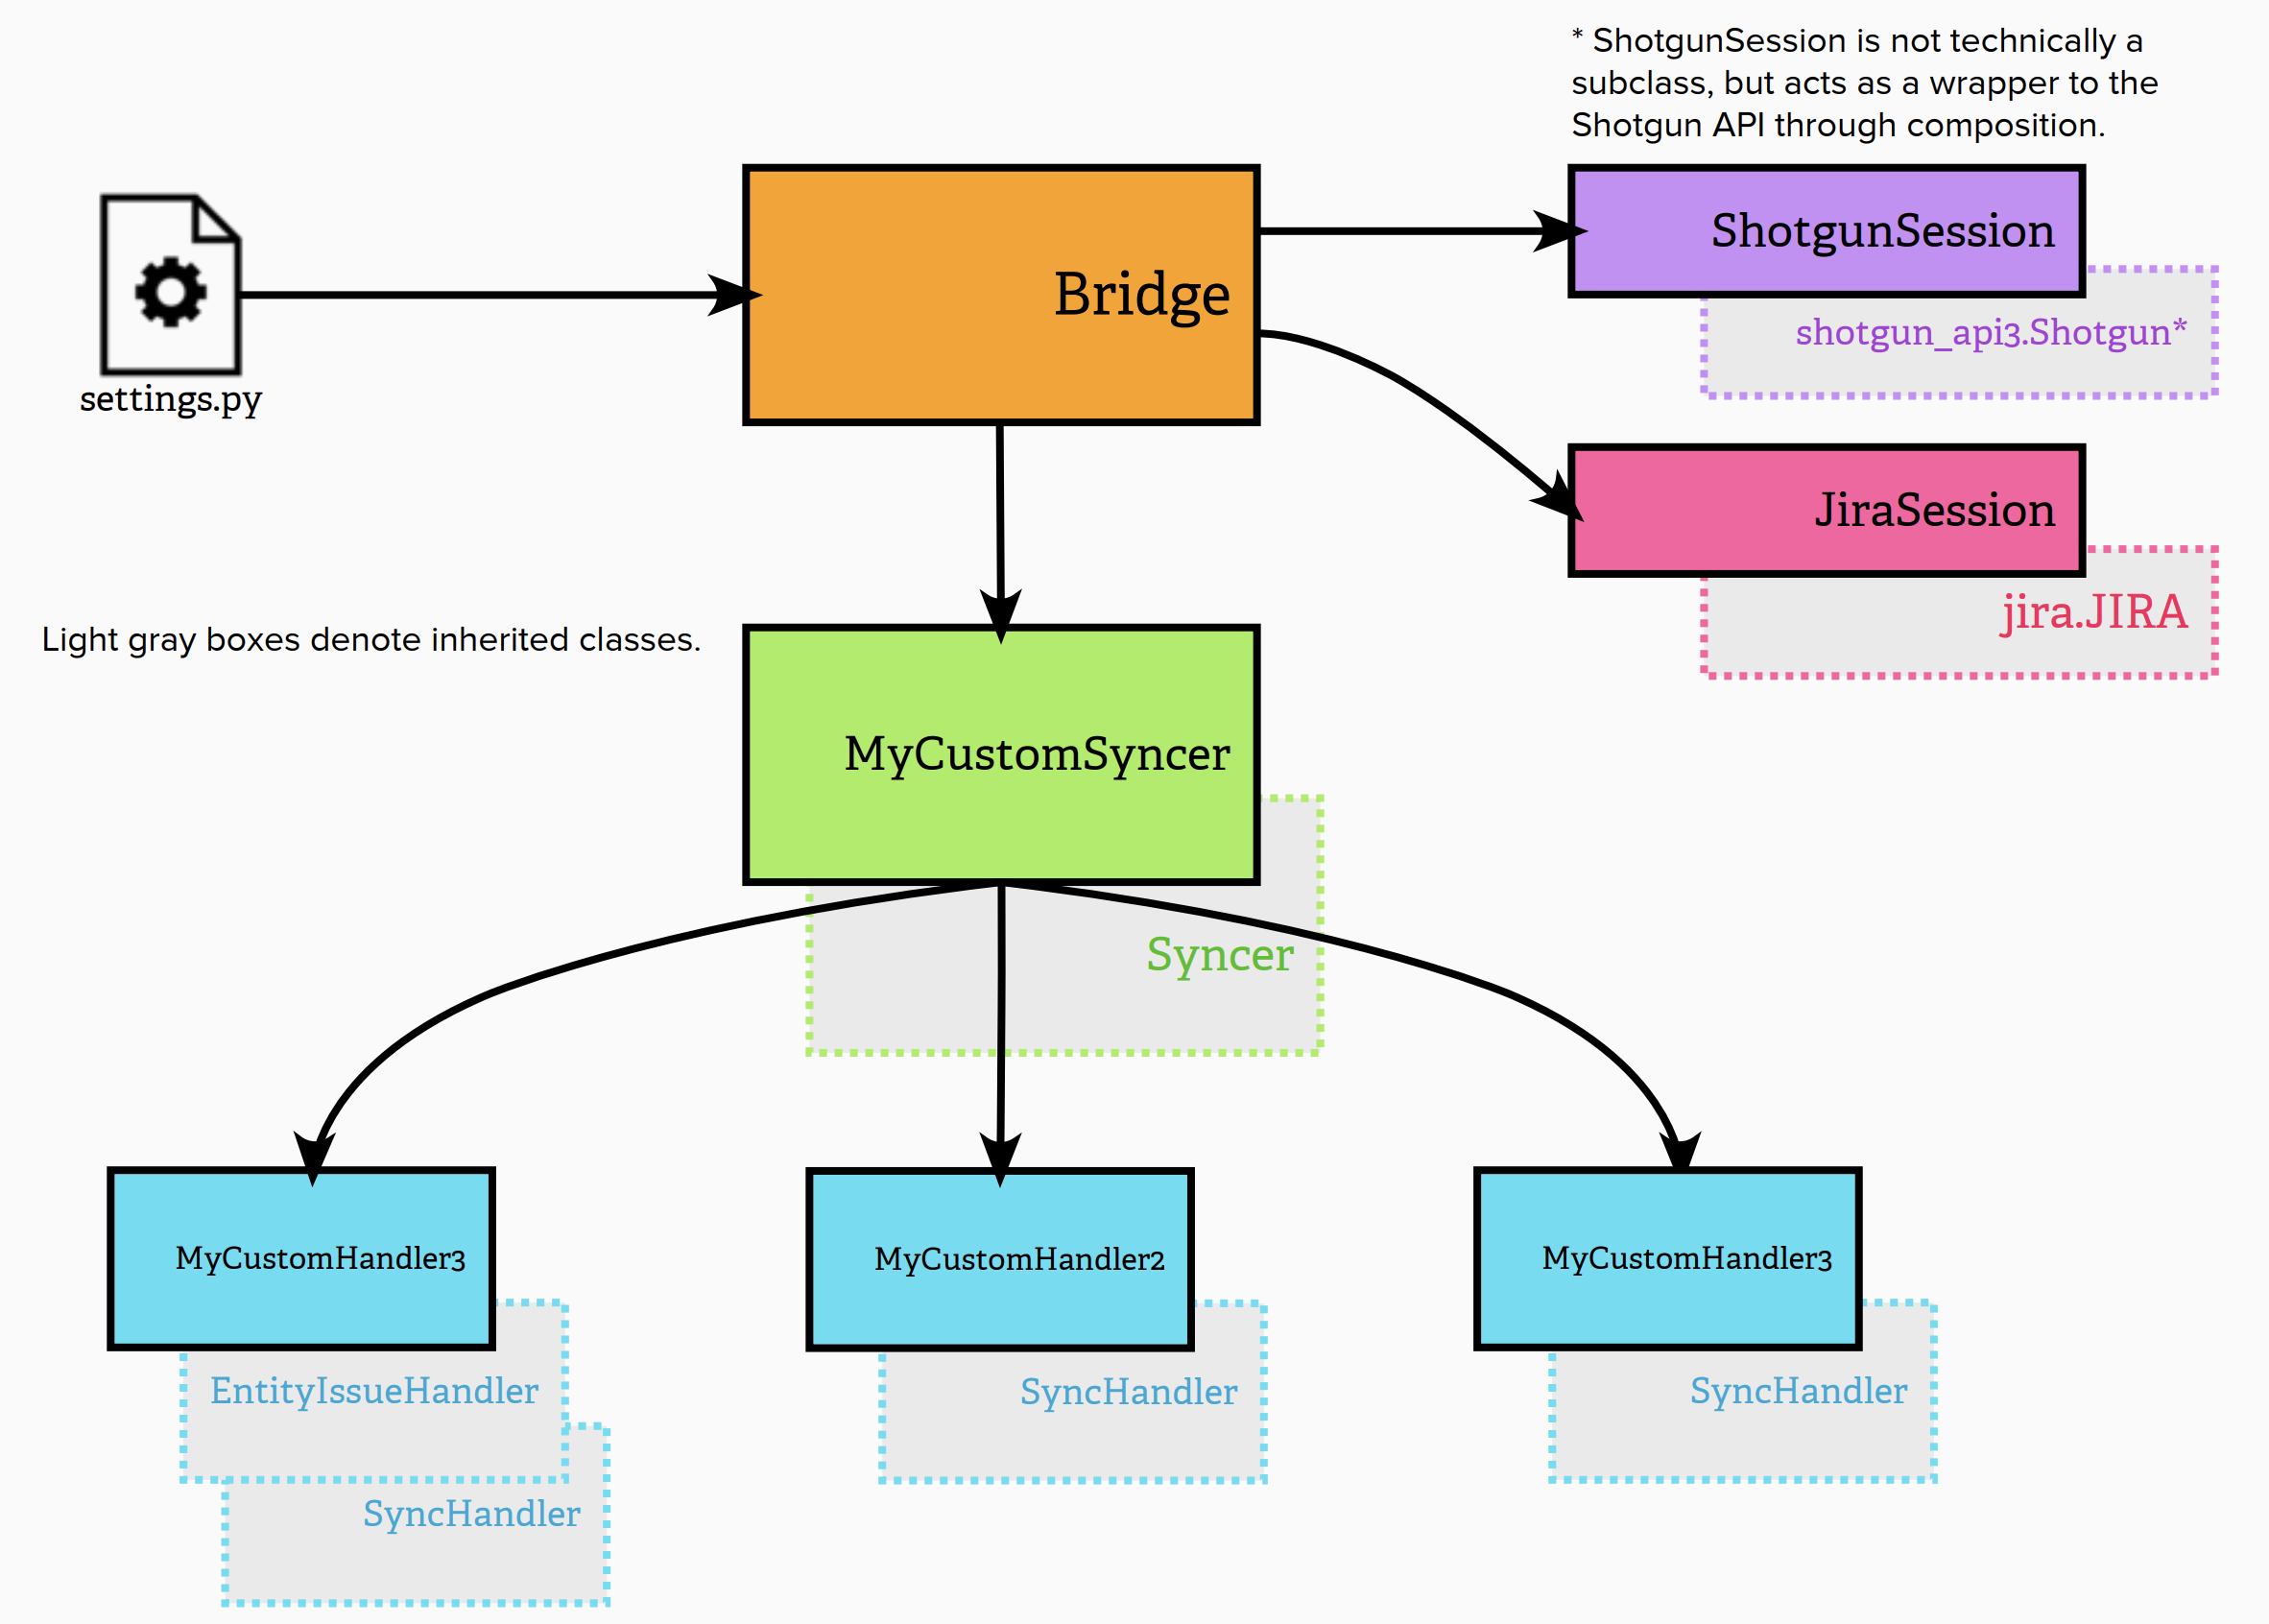
This means any one project can only use one Syncer at a time. In the interest of compatibility,
we'll write our own Syncer implementation and include only the handlers that we want. In
our example implementation, we've decided not to include the Task and Note syncing handlers as we really
only care about Tickets and Replies. If that's something you want to keep, simply add those handlers
onto the TicketIssueSyncer::handlers property.
The SyncHandler is where the data processing occurs. First it checks if the payload is relevant
to it (Is it the correct Entity? Is the changed field relevant?). If it doesn't match a handler, it will
continue to the next until one has accepted it or none match the payload. Once a handler accepts a payload,
it will process it per your implementation.
Note that only one handler ever processes an event. In the event that you want to combine multiple handlers,
you need to create a composite handler that then uses the contained handlers' process
calls. You can see this in action with the EnableSyncingHandler which syncs both the Task and
its Notes when the checkbox is enabled.
After you're done with your custom code, we'll have to briefly go back and change the Jira Webhook
and Shotgun Project configuration to match our new Syncer. In our example we added a tickets
entry in settings.py:
"tickets": {
    "syncer": "sg_jira.TicketIssueSyncer",
    "settings": {
        "issue_type": "Task"
        # These are passed as kwargs to TicketIssueSyncer.__init__
        },
},
Which means our new Jira Webhook target is
https://bridge.aws.pixel-nexus.com/jira2sg/tickets/issue/${issue.key} and our Shotgun Project
URL is https://bridge.aws.pixel-nexus.com/sg2jira/tickets.
Restart your services and you're good to go!
We can't say we're done without testing it first, so let's make a Ticket. I've made an "Example Ticket" which we'll sync to Jira.
The Ticket entry page should look like this on Shotgun:
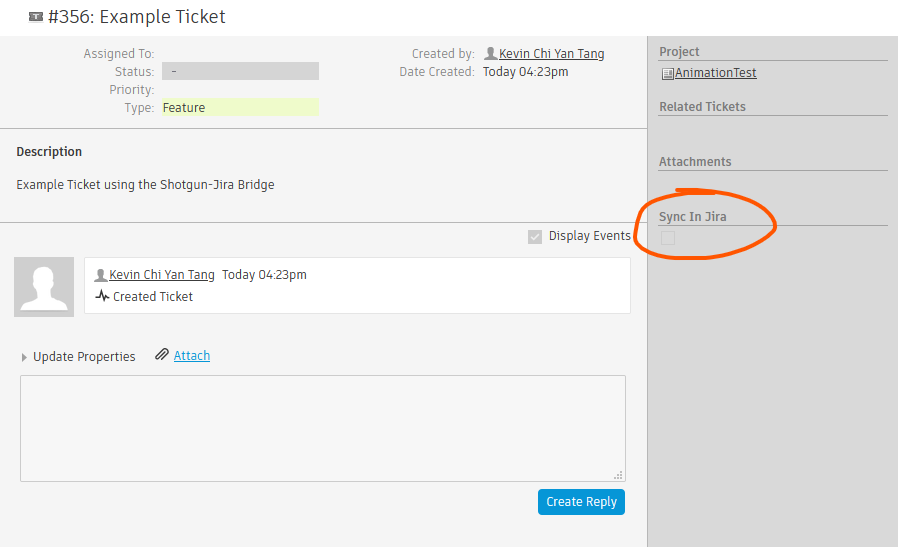
If you don't see the "Sync In Jira" on the righthand side, you can add it in the page designer (top right) under "Pivot Fields".
When we check the "Sync in Jira" box, we should get a corresponding Issue on Jira.
On Jira, it then should look like this:
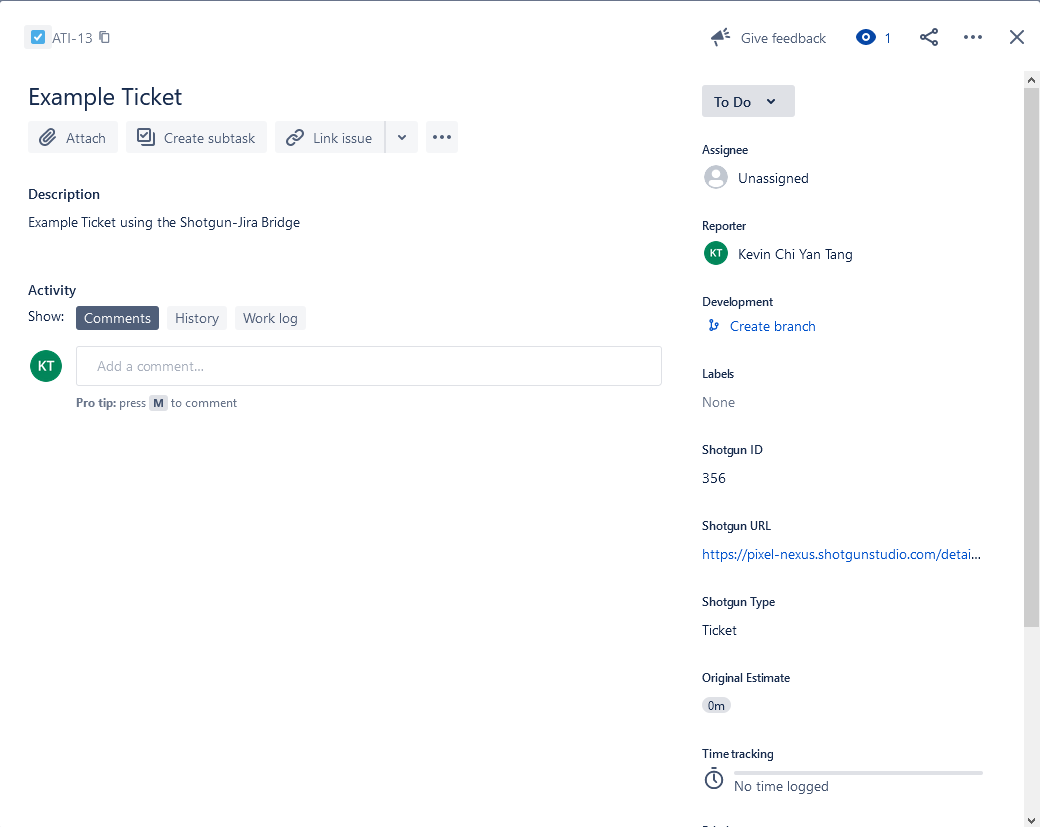
Additionally, you'll notice the Ticket has it's "Jira Key" changed to ATI-13 to match our new Issue.
Our comments are also syncing back and forth now.
Shotgun Ticket: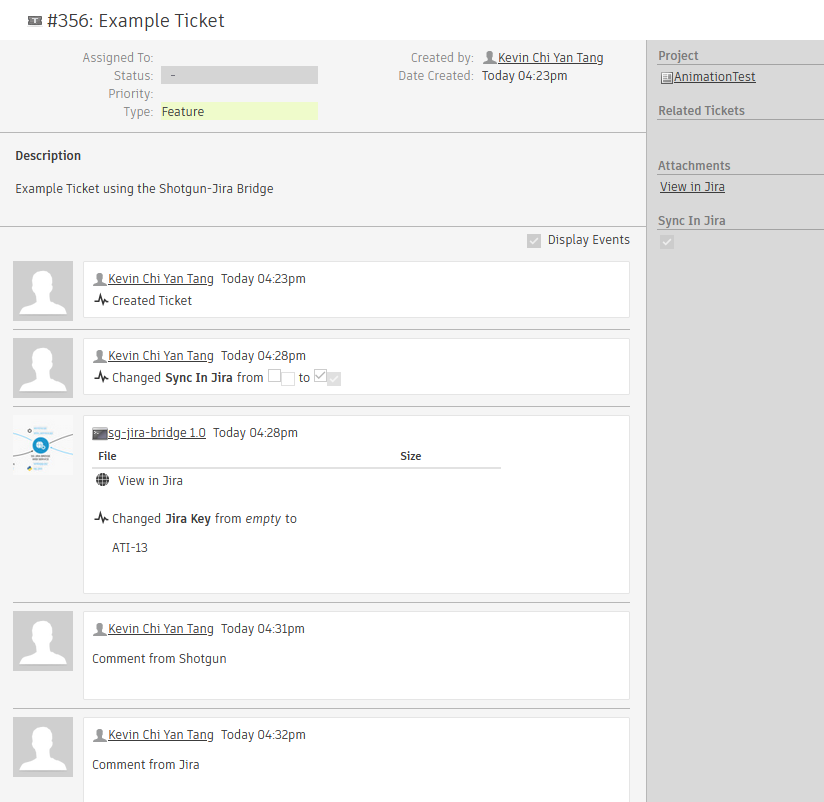
Jira Issue: 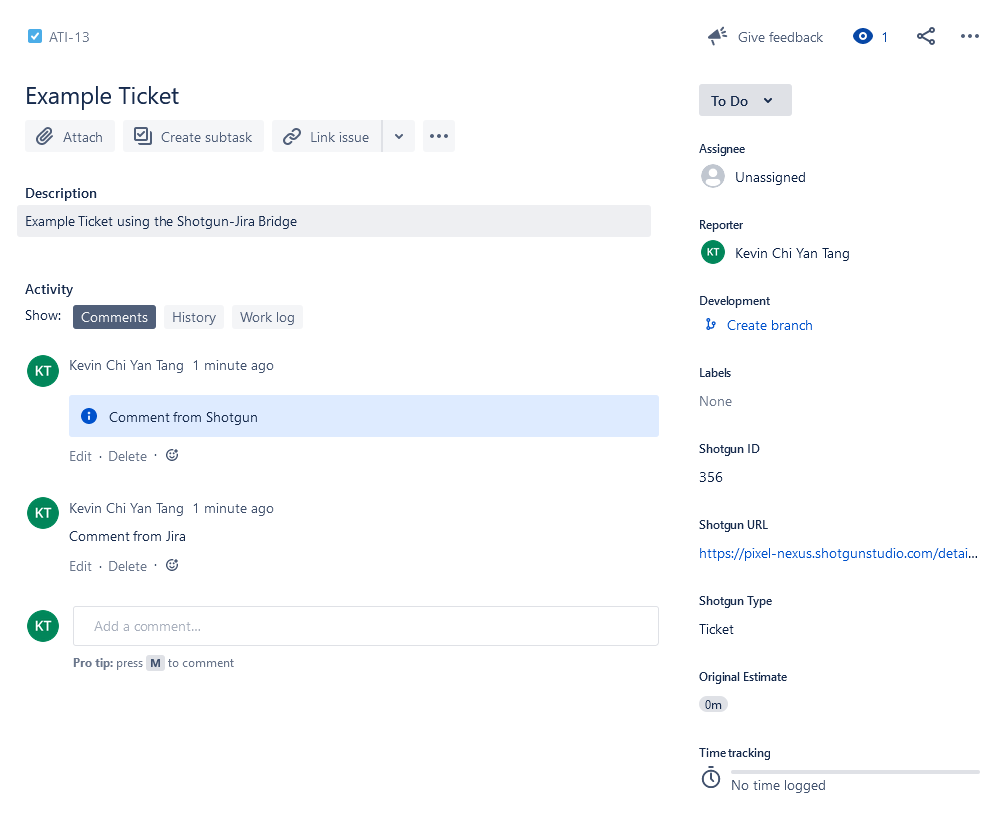
If you've having issues with the user not being linked, you may have forgotten to run
update_shotgun_users.
We discussed why and how to integrate Shotgun and Jira closely with eachother, including our own customizations using Shotgun Tickets.
The general architecture and mechanisms for the Shotgun Jira Bridge apply to any third party integrations you'd want to do. You could use GitHub issues, Trello, Slack or any combination of tools.
The handlers out-of-the-box do leave some to be desired, I'd personally recommend just writing your own handlers to fit your exact needs instead of trying to adjust the existing ones to fit the requirements.
Another useful addition would be to run the user synchronization script on some interval, as it's very likely to forget to run this each time you add a new user to your environment. In our setup we've setup a daily crontab to run it over all projects.
In the end it's important to keep the goal in mind and determine the best choice for your environment.